
Preface#
To make up for that computer class I once missed—and because I want (and really need) to run my GitHub long-term—it’s necessary to learn Git. This post is based on materials I found online plus my own understanding of Git at a beginner level. It’s not very professional, but I think it’s enough for most practitioners. Alright then, let’s begin—written for you, and also for myself.
What Is Git?#
Linus created the open-source Linux in 1991. Since then, Linux has kept evolving and has become the largest server operating system software. Linus created Linux, but Linux grew thanks to volunteers around the world. With so many people writing code for Linux across the globe, how was the Linux source code managed? In fact, before 2002, volunteers sent source code patches to Linus as diffs, and Linus manually merged them!
You might wonder: why didn’t Linus put Linux code into a version control system? Weren’t there free VCS tools like CVS and SVN? Because Linus firmly opposed CVS and SVN: these centralized version control systems were not only slow, but also required network access to use. There were some commercial version control systems that were better than CVS/SVN, but they cost money, which didn’t align with Linux’s open-source spirit. However, by 2002, Linux had been developed for ten years; the repository had grown so large that Linus could no longer manage it by hand. The community strongly disliked this workflow, so Linus chose a commercial version control system called BitKeeper. BitMover (the company behind BitKeeper), out of humanitarian spirit, granted the Linux community a free license to use it.
That peaceful situation was broken in 2005. The Linux community gathered many brilliant people, and inevitably picked up some “outlaw” habits. Andrew (who developed Samba) attempted to crack BitKeeper’s protocol (and he wasn’t the only one). BitMover discovered it (their monitoring was pretty good!), got angry, and decided to revoke the Linux community’s free usage rights.
Could Linus apologize and promise to strictly discipline everyone? Yeah—no. What actually happened was:
Linus spent two weeks and wrote a distributed version control system in C. That was Git! Within one month, the Linux source code was managed by Git. Now that’s what “legendary” looks like. Git quickly became the most popular distributed version control system, especially after GitHub launched in 2008, offering free Git hosting for open-source projects. Countless projects migrated to GitHub, including jQuery, PHP, Ruby, and more.
History is full of coincidences. If BitMover hadn’t threatened the Linux community back then, we might not have today’s free, extremely useful Git.
Install Git#
Install Git on Linux#
First, you can try typing git to see whether Git is already installed:
$ git
The program 'git' is currently not installed. You can install it by typing:
sudo apt-get install git
As above, many Linux distributions will kindly tell you Git isn’t installed and how to install it.
If you happen to use Debian or Ubuntu, a single sudo apt install git installs Git directly—very simple.
For other Linux distributions, refer to your distro’s documentation. For example, on RedHat Linux you can install via sudo yum install git. If your distro has no package manager, you can download the source and compile it yourself—only recommended for experienced users.
Install Git on macOS#
If you develop on a Mac, there are two ways to install Git.
One is to install the Homebrew package manager first, then install Git via Homebrew (recommended):
$ brew install git
The second way is simpler, but requires downloading a huge Xcode. Install Xcode from the App Store. Xcode includes Git, but it’s not installed by default. You need to run Xcode, open “Xcode” -> “Preferences”, find “Downloads”, select “Command Line Tools”, and click “Install”.
Install Git on Windows#
To use Git on Windows, I recommend downloading the installer ↗ from the official Git website and installing with the default options. After installation, find “Git” -> “Git Bash” in the Start menu; if a terminal-like window appears, Git is installed successfully.
There’s also another installation method, but I’m too lazy to research it, so I won’t write it in detail. It’s a package manager method called Scoop ↗.
Configure Git#
After installing Git, there’s one last step: run the following in your terminal:
$ git config --global user.name "Your Name"
$ git config --global user.email "email@example.com"
Because Git is a distributed version control system, each machine needs to identify itself: your name and email address. You might worry: what if someone pretends to be someone else? Don’t worry too much—first, we assume most people are kind and clueless; second, even if someone impersonates, there are ways to trace it.
Note the --global flag for git config: it applies to all Git repositories on this machine. You can also set different user name/email per repository if needed.
Create a Repository#
What is a repository? A repository is the “repo” on GitHub (Repository). You can simply think of it as a directory. All files inside can be managed by Git—every modification and deletion can be tracked, so you can inspect history at any time or “restore” at some point in the future.
So creating a repository is simple. First choose a place and create an empty directory:
$ mkdir learngit
$ cd learngit
$ pwd
/Users/michael/learngit
Second, run git init to turn this directory into a Git-managed repo:
$ git init
Initialized empty Git repository in /Users/michael/learngit/.git/
In an instant Git creates the repo and tells you it’s empty. Careful readers will notice a new .git directory in the current directory; Git uses it to track and manage the repository. Don’t manually modify files inside .git, or you might corrupt the repo.
If you don’t see .git, it’s because it’s hidden by default—use ls -ah to view it.
You don’t have to initialize a repo only in an empty directory—you can also initialize in a directory that already has files. However, it’s not recommended to learn Git on a confidential project you’re actively developing; if something goes wrong, you’re on your own.
Add Files to the Repository#
Let’s be clear: all version control systems can only track changes in text files, such as TXT, web pages, and source code. Git is no exception. A VCS can tell you each change—for example, adding “Linux” on line 5 and deleting “Windows” on line 8. But for binary files like images and videos, while they can be stored in version control, the system can’t show meaningful diffs. It can only record that a file changed—e.g., an image went from 100KB to 120KB—but not what changed.
Unfortunately, Microsoft Word files are binary, so version control systems cannot track changes in Word documents. The earlier examples were just for demonstration. If you want to truly benefit from version control, write in plain text.
Text files also have encodings: Chinese commonly uses GBK, Japanese uses Shift_JIS, etc. If you don’t have legacy constraints, strongly recommend UTF-8: one encoding for all languages—no conflicts and supported across platforms.
Compared to “putting an elephant into a fridge takes 3 steps”, putting a file into a Git repo takes only 2 steps.
Step 1: use git add to tell Git to add the file to the staging area:
$ git add readme.txt # or `git add .` to stage all updated files
Running the command produces no output, which is normal. The Unix philosophy is: “no news is good news.”
Step 2: use git commit to tell Git to commit the staged files:
$ git commit -m "wrote a readme file"
[master (root-commit) eaadf4e] wrote a readme file
 1 file changed, 2 insertions(+)
create mode 100644 readme.txtBriefly: for git commit, -m provides the commit message. You can write anything, but meaningful messages help you find changes later.
Can you skip -m "xxx"? Yes, there are ways, but it’s strongly discouraged. A clear message is important for yourself and others. If you really don’t want to, Google it yourself—I’m too lazy to write it.
After git commit succeeds, it tells you: 1 file changed (one file was changed) and 2 insertions (two lines inserted).
Why does Git use two steps (add, then commit) to add files? Because commit can include many files. You can add multiple times, then commit once, for example:
$ git add file1.txt
$ git add file2.txt file3.txt
$ git commit -m "add 3 files."
Check Status#
git status lets you see the current state of the repo at any time. The output below says readme.txt was modified but the changes are not staged yet.
$ git status
On branch master
Changes not staged for commit:
	(use "git add <file>..." to update what will be committed)
	(use "git checkout -- <file>..." to discard changes in working directory)

	modified:   readme.txt

no changes added to commit (use "git add" and/or "git commit -a")
Git says readme.txt is modified. If you want to see exactly what changed, use git diff. For example, after a two-week vacation, you may not remember what you changed last time, so you check:
$ git diff readme.txt
diff --git a/readme.txt b/readme.txt
index 46d49bf..9247db6 100644
--- a/readme.txt
+++ b/readme.txt
@@ -1,2 +1,2 @@
-Git is a version control system.
+Git is a distributed version control system.
 Git is free software.
git diff literally shows the difference, in the standard Unix diff format. Here we added the word distributed on the first line.
Version Rollback#
If you mess up a file or accidentally delete something, you can restore it from the latest commit and keep working, instead of losing months of work. That’s version rollback/jumping.
In real work, nobody can remember what changed in a file with thousands of lines each time—otherwise why would we need version control? Git has a command to show history: git log.
$ git log
commit 1094adb7b9b3807259d8cb349e7df1d4d6477073 (HEAD -> master)
Author: Michael Liao <askxuefeng@gmail.com>
Date:   Fri May 18 21:06:15 2018 +0800

		append GPL

commit e475afc93c209a690c39c13a46716e8fa000c366
Author: Michael Liao <askxuefeng@gmail.com>
Date:   Fri May 18 21:03:36 2018 +0800

		add distributed

commit eaadf4e385e865d25c48e7ca9c8395c3f7dfaef0
Author: Michael Liao <askxuefeng@gmail.com>
Date:   Fri May 18 20:59:18 2018 +0800

		wrote a readme file
git log shows commits from newest to oldest. Here there are 3 commits: latest is append GPL, then add distributed, earliest is wrote a readme file.
If the output is too verbose, add --pretty=oneline:
$ git log --pretty=oneline
1094adb7b9b3807259d8cb349e7df1d4d6477073 (HEAD -> master) append GPL
e475afc93c209a690c39c13a46716e8fa000c366 add distributed
eaadf4e385e865d25c48e7ca9c8395c3f7dfaef0 wrote a readme file
Friendly reminder: that long string like 1094adb... is the commit id. Unlike SVN, Git commit ids aren’t 1,2,3... incremental numbers. They are large SHA1 values in hexadecimal. Your commit ids will differ from mine—use yours. Why so long? Because Git is distributed, and in multi-person collaboration, incremental numbers would easily conflict.
Now let’s time-travel. Suppose we want to roll readme.txt back to the previous version, i.e. the commit add distributed. How?
First, Git needs to know what the current version is. In Git, HEAD represents the current version (the latest commit). The previous version is HEAD^, the one before that is HEAD^^. For 100 versions back, instead of writing 100 carets, use HEAD~100.
To roll back from append GPL to the previous version add distributed, use git reset:
$ git reset --hard HEAD^
HEAD is now at e475afc add distributed
What does --hard mean?
--hardresets to the previous committed state--softresets to the previous uncommitted state--mixedresets to the state where changes are staged but not committed
For now, feel free to use --hard. If you run git log again, you’ll notice the latest commit append GPL disappears! It’s like traveling from the 21st century to the 19th—how do you get back?
There is still a way: as long as you haven’t closed the terminal, you can scroll up and find the commit id for append GPL (e.g. 1094adb...). Then you can jump back:
$ git reset --hard 1094a
HEAD is now at 83b0afe append GPL
You don’t need the full commit id; the first few characters are enough. Git will search for it. But don’t use too few characters, or Git may find multiple matches.
Git is fast at rollback because internally it has a HEAD pointer to the current version. When you reset, Git mostly just moves HEAD.
Now suppose you rolled back, shut down your computer, and the next day you regret it and want to restore the newer version. But you don’t remember the new commit id—what then?
Git always has “regret medicine”. When you use git reset --hard HEAD^ to roll back to add distributed and later want to go back to append GPL, you need the commit id of append GPL. Git provides git reflog to record each command:
$ git reflog
e475afc HEAD@{1}: reset: moving to HEAD^
1094adb (HEAD -> master) HEAD@{2}: commit: append GPL
e475afc HEAD@{3}: commit: add distributed
eaadf4e HEAD@{4}: commit (initial): wrote a readme file
From the output you can see the commit id for append GPL is 1094adb. Now you can time-travel back to the future.
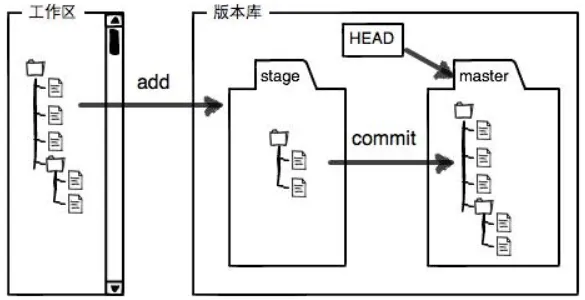
Working Directory and Staging Area#
Git’s repository contains many things. The most important is the staging area called stage (or index), plus Git’s first automatically created branch master, and a pointer to master called HEAD. We’ll talk about branches and HEAD later.
git add actually puts your changes into the staging area (Stage). Then git commit commits everything in the staging area to the branch in one shot. I don’t think there’s much else that must be “understood”—just look at the diagram. It’s also easy to understand that the working directory is basically your local project folder.
Discard Changes#
If you find a mistake and haven’t committed yet, it’s easy to fix. You can manually delete the last line and restore the file.
There’s also a command that achieves this: git checkout -- file discards changes in the working directory.
$ git checkout -- readme.txt
git checkout -- readme.txt means: discard all modifications to readme.txt in the working directory. There are two cases:
- If
readme.txtis modified but not staged, discarding changes resets it to match the repository. - If
readme.txtis staged and then modified again, discarding changes resets it back to the staged version.
In short, it returns the file to the state of the last git commit or git add.
If you staged some wrong changes with git add but notice before committing, you can unstage them back to the working directory with git reset HEAD <file>:
$ git reset HEAD readme.txt
Unstaged changes after reset:
M	readme.txt
git reset can roll back versions, and it can also move staged changes back to the working directory. Using HEAD means the latest version. After running it, the staging area becomes clean again, and only the working directory has modifications.
Remember how to discard working directory changes? The answer is above:
$ git checkout -- readme.txt

$ git status
On branch master
nothing to commit, working tree clean
Delete Files#
Usually you just delete unwanted files in your file manager or using rm:
$ rm test.txt
At this point Git knows you deleted the file, so your working directory differs from the repository. If you push directly, that may cause issues. First check with git status:
$ git status
On branch master
Changes not staged for commit:
	(use "git add/rm <file>..." to update what will be committed)
	(use "git checkout -- <file>..." to discard changes in working directory)

	deleted:    test.txt

no changes added to commit (use "git add" and/or "git commit -a")
Now you have two choices. If you really want to delete the file from the repository, use git rm and then commit:
$ git rm test.txt
rm 'test.txt'

$ git commit -m "remove test.txt"
[master d46f35e] remove test.txt
 1 file changed, 1 deletion(-)
 delete mode 100644 test.txt
Now the file is removed from the repository. In other words: deleting the file manually and then using git rm <file> is effectively the same as git add <file> for recording the deletion.
The other case is: you deleted it by mistake. Since the file still exists in the repository, you can easily restore it to the latest version:
$ git checkout -- test.txt
git checkout replaces the working directory version with the repository version. Whether you modified or deleted the file, it can “restore in one click.”
Afterword#
The story isn’t over yet. Everything above can be done in other version control tools too; it hasn’t fully shown Git’s unique advantages. Keep up—next post we’ll go for something more advanced, so you can really feel Git’s power.